Saturday, June 05, 2010
Using The Gimp for Astrophotography (Part 3)
In previous posts (part 1, part 2) we have covered using the free image manipulation program GIMP for stacking images to improve brightness and resolution and creating animations. This installment handles how to create mosaics. We create mosaics for many reasons, making wide field views of the sky for example. I mostly use it to make mosaics of the Moon from images shot through my webcam on one or other of my telescopes.
The process is similar to that before, using layers and the “difference” function in the layer pane. First of course you create the images that you want to combine into a mosaic. For lunar mosaics I take images with about a 1/3rd overlap to ensure adequate registration without distortion near the edges of the image. Then in the GIMP, choose File | New to create a canvas to assemble your images on. The size of the blank file will depend on the size of your images (eg since my individual images from my webcam are often 640x 480, I often create a new file 3000x2000 to assemble the mosaic.
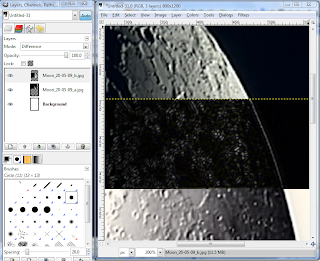
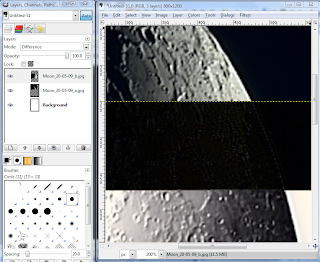
Left image: two images stacked but not registered, with the layer mode set to "difference". Right Image: When the images are aligned the overlap area is dark (click to embiggen for more detail).
Once you have a new file as your bank canvas, open the first image as a layer (File | Open as layers in the image window menu), where you place that image depends on where the other images fit. For lunar mosaics of the waning Moon I often place it in the top left hand corner. The open your second frame as a layer. Roughly align the overlapping sections, then in the Layers panel (File | Dialogs | Layers if it is not coming up automatically), in the Mode drop down box choose “Difference”. The overlapping sections now go dark and light. Use the arrow keys to move the sections over each other until you get maximum darkness – this gives you maximum alignment. Now go back to the mode box an choose “Normal” and your first part of the aligned mosaic is finished.
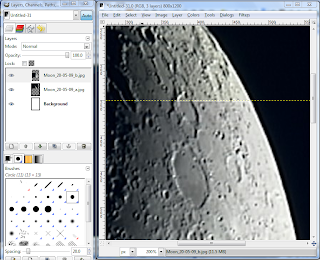 Overlaid images in Normal mode after alignment, click to embiggen.
Or not quite. My webcam images have a light border around them which messes up the smoothness of the mosaic. So I use the selection tool to select the part of the image that doesn’t have the lightness, then the menu item Layer | Crop to selection (important! use the Layer NOT the image menu item, if you use the image you will crop away everything) to get rid of the border.
Repeat the process until you have added all your images, and you are almost finished. When saving, if you save in JPEG, GIF or PNG format you will be asked to merge of flatten images, chose Merge (if you save as a GIMP XCF file you don’t need to worry about it, but if you want to show the image on a web page you need to save as one of the standard formats).
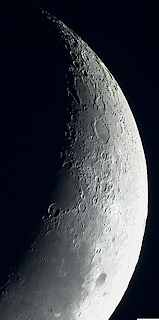 Now, rejoice in you completed Mosaic (click to embiggen).
Labels: astrophotography
# posted by Ian Musgrave @ 6:00 am 
Comments:
<< Home

The effects is that you are just stitching together multiple images to make a mosaic. The base photo is modified to the extent that it has other images added to it.
Post a Comment
<< Home
![]()

 Click to read about or order
 Click to read about or order
 Click to read about or order
 Click to read about or order


